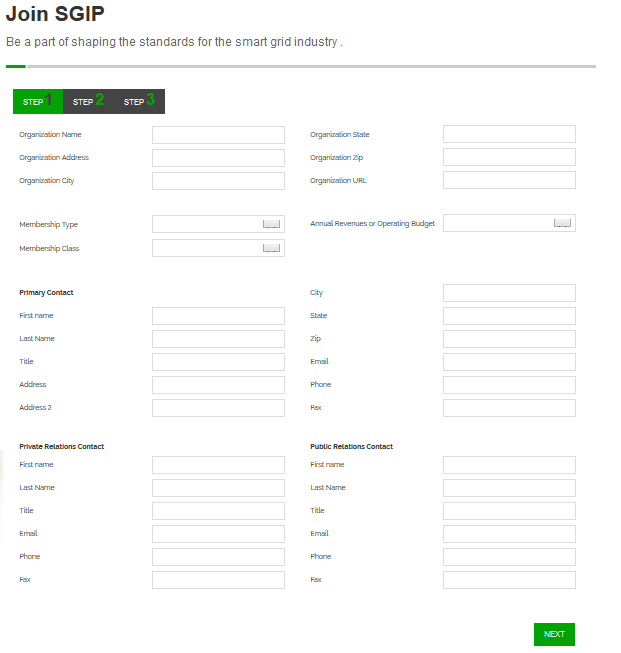
To join SGIP online, a user will either click the JOIN US link at the top of the website, or click on the APPLY NOW button at the bottom of the web pages. After clicking on the link, the user will be taken to the online join form, which is shown below:
Adding/Editing Membership Types
In order to add/edit the list that shows up in the Membership Types drop down, login and click on ADMIN. Next click on MANAGE ADD-ONS, MEMBERSHIP MANAGER and then MEMBERSHIP TYPES. This will show you a list of all currently available membership types. To edit one, click on the paper/pencil icon next to the name of the membership type or click ADD to add a new membership type.
The first thing you will enter is the name of the membership type, such as "General Membership > or equal to $1 billion Participating". You may also wish to enter a maximum number of individuals or companies that can sign up for this type of membership. Next, click the PRICING tab to enter the price to join as this type of member.
On the FULFILLMENT tab, set the Fulfillment Notification Group if you want certain people at SGIP to be notified when this type of member joins.
In the MEMBERSHIP tab, you can set a group that you want members to be added to for the specific membership type. Choose whether the membership type is periodic or calendar based and the duration of the membership. Check RENEW ON EXPIRATION if you want to set up automatic renewal for this membership type. Also type in the Renewal Custom Price, which is the price this type of member is charged upon renewal.
The PURCHASE tab enables you to set up custom messages for the invoices and/or receipts for this type of member.
Click OK when you are done entering or editing information to save changes.
NOTE 1: When someone joins SGIP, they are listed as PENDING in the system. In order to make their membership account active, an administrator at SGIP has to login and click on ADMIN. Then click on MANAGE ADD-ONS, MEMBERSHIP MANAGER, and MEMBERSHIP MANAGER. This will list all open accounts or all membership accounts, depending on your selection on the screen. Click on the account name for the pending account. In the STATUS field, select ACTIVE from the drop down. Click OK to save changes. The account will now be active.
NOTE 2: When someone chooses to pay by check, they are listed as a non-membership account until payment is received and processed. To enter a check payment, login and click ADMIN. Then click on MANAGE ADD-ONS, MEMBERSHIP MANAGER, and INOVICE MANAGER. You will see a list of all open accounts. Click on the TOOLS tab at the top of the page. From here select ENTER PAYMENTS/APPLY CREDITS. Select the account from the drop down that you are entering a check payment for. Select CHECK as the payment method. Enter the check number and amount of payment, and then click on the Invoice that you are paying. Finally click on PROCESS PAYMENT. When you are done, the account will be listed as a membership account with PENDING status until you complete the instructions from Note 1.
Adding/Editing Membership Classes
In order to add/edit the list that shows up in the Membership Classes drop down, login and click on ADMIN. Next click on MANAGE ADD-ONS, SGIP MEMBERSHIP APPLICATION and then MEMBERSHIP CLASSES. This will show you a list of all currently available membership classes. To edit one, click on the paper/pencil icon next to the name of the membership class or click ADD to add a new membership class.
Here you will enter the name of the membership class, such as "Participating". Click OK to save changes.
Adding/Editing Annual Revenues
In order to add/edit the list that shows up in the Annual Revenues drop down, login and click on ADMIN. Next click on MANAGE ADD-ONS, SGIP MEMBERSHIP APPLICATION and then ANNUAL REVENUES. This will show you a list of all currently available annual revenues. To edit one, click on the paper/pencil icon next to the name of the record or click ADD to add a new annual revenue amount.
The first thing you will enter is the name of the annual revenue category, such as "> or equal to $1 billion". You will also select the Membership Category that applies to this annual revenue amount. Click OK to save changes.
NOTE: To add or edit Membership Categories, login and click on ADMIN. Next click on MANAGE ADD-ONS, SGIP MEMBERSHIP APPLICATION and then MEMBERSHIP CATEGORIES. Here you can click on the paper/pencil icon to edit a specific category, or click ADD to add a new category. Click OK to save changes.
Setting Up Membership Type Rules
In order to ensure that when someone joins they are placed in the correct membership type, you must set up membership type rules. To access these rules, login and click on ADMIN. Next click on MANAGE ADD-ONS, SGIP MEMBERSHIP APPLICATION and then SGIP MEMBERSHIP TYPE RULES. This will show you a list of all currently listed rules. To edit one, click on the paper/pencil icon next to the name of the record or click ADD to add a new rule. You will enter the name of the rule, such as "General Membership > or equal to $1 billion Participating", and then select from drop downs the membership type, membership class, and membership category that when selected will put someone in a specific membership type. Click OK to save changes.