The blog add-on is an easy way to post blogs to your website. By using the settings within the add-on, a site can host multiple blogs.
Create a New Blog Page
When you are on the web page where you would like the blog to appear and are logged on as an Administrator, you will select the QUICK EDIT option. Next, put your cursor in the body and select BLOG from the Add-ons drop-down menu as shown below:
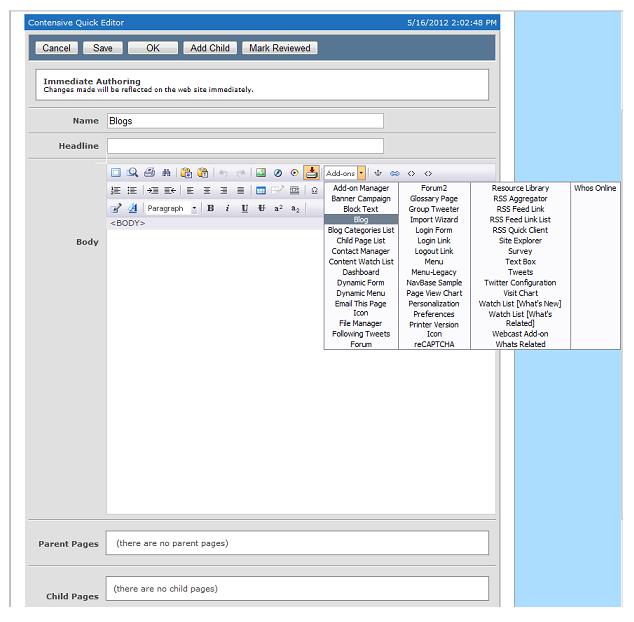
You will also name your blog record and
create a headline for your blog here. Click OK to save the blog to this page.
You now have the default blog page configured with you as the creator or
primary author.
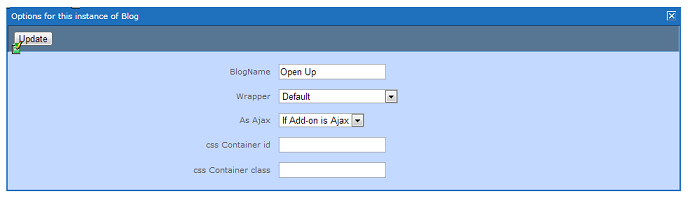
If you need to add another blog to your website, drop the blog add-on on the new webpage and click on ADVANCED EDIT. When you see the advanced edit screen below, click on the WRENCH. You will then enter the name of your new blog in the BlogName field and click UPDATE to save the name of your new blog.
Different Blog Views
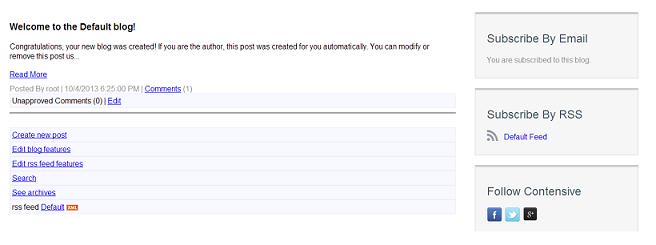
The List View shows you a short list of blog posts. The blog record includes a caption and description field. These fields appear at the top of the blog list page only, and are omitted on all other blog views.
The Article View is where you read the details of a specific post.
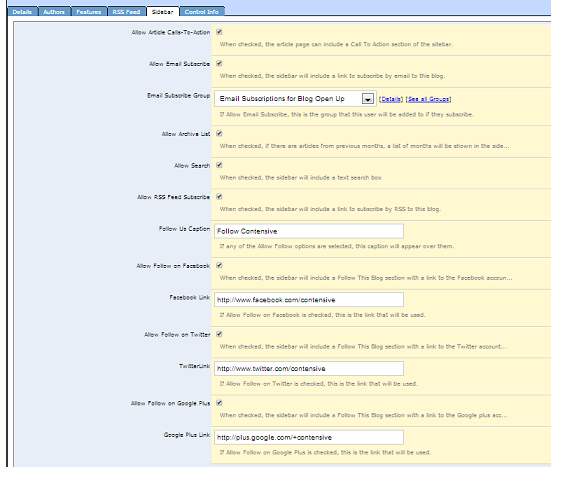
The Sidebar, can be optionally added to the right side of the screen for the list view and article view. It can include custom calls to action, email subscriptions and the ability to follow your company on social media. These options are set by you as specified below in the Sidebar Options section. If the width of the page is too narrow to fit the sidebar, it is moved under the list view.
Blog Author
The blog author is set when the blog is setup. Additional Authors can be added by adding people to a group you create, then selecting that group as the authoring group in the blog record when you click EDIT BLOG FEATURES under the current blog.
The author has editing and posting access to the blog and can receive the optional comment notification by clicking "Email Authors When Comments Added" in the FEATURES tab.
To prevent the author from displaying on an article, click on the paper/pencil icon next to the article name, click on the FEATURES tab and then click on the ANONYMOUS field.
To edit the blog, click on the EDIT link under the current blog. This will open a record of your blog where you can change the blog title, text and any images. Click POST to save changes. If you want to delete a blog, click on DELETE at the bottom of the edit record.
Set Custom Options for the Blog
To change blog options, click on the EDIT BLOG FEATURES link under the current blog. This will open a record of your blog.
In the DETAILS TAB you can set and change the blog caption and description that shows up at the top of the blog page while in list view.
Go to the FEATURES TAB, and you can change the maximum number of
characters for each entry, specify whether anonymous users can post, indicate
if comments must be approved before displaying, state if an email should be
sent to notify of a new post, state image widths, determine the number of posts
to display, and state whether categories are available for each post. Click OK
to save changes.
Create Calls To Action
To create a CALL TO ACTION, login and click ADMIN HOME. From here click MANAGE ADD-ONS and then CALLS TO ACTION. Click on CALLS TO ACTION list to see a list of all available calls to action. Click ADD to create a new call to action. Here you will specify the caption for the button, the link to the website the button will take you to, the headline for your call to action, and additional text you want the website visitor to read about your call to action. Click OK to save changes.
Assign a Call to Action to a Blog Post
To assign a call to action to a blog post, login and click on EDIT and then click the paper/pencil icon to open your blog. Click on the CALLS TO ACTION TAB and check the CALL TO ACTION in the list that you want to include. Click OK to save changes.
The RSS Feeds is a separate collection that is automatically added to your site if you do not already have it. Click for more information about RSS Feeds.
When the blog is automatically created, it creates an RSS feed for the blog. If you want the posts added to a different RSS Feed, you can change that in the Blog record. Login and click on EDIT BLOG FEATURES. In the blog record, click on the RSS FEED TAB. Select your RSS FEED from the drop down menu. If you need to create a new feed, click SEE ALL RSS FEEDS and enter the information requested. You can then select this feed from the drop down menu. Also click on the SIDEBAR TAB and check ALLOW RSS FEED SUBSCRIBE so that the sidebar will include a link to subscribe to this blog via RSS. Click OK to save changes.
In each post, the caption and a snippet from the post is added to the RSS Feed. They are stored in the RSS Feed tab of the Blog Entry record. These will not automatically update with future changes to the blog entry. You have to change them in the record. Also, you can optionally set a publish and expiration date for the RSS Feed entry in the RSS Feed tab of the blog entry record.
A link to the RSS feed appears under the blog list view. You can also add the RSS Feed to the sidebar as detailed in Sidebar Options above.
Images
Categories can be created to group blog posts, as well to block posts to only those visitors with specific rights. To create a blog category, login and click ADMIN HOME. From here click MANAGE ADD-ONS and then BLOG. Click on BLOG CATEGORIES to see a list of all available categories. Click ADD to create a new category.
To assign a blog post to a category, login and click on EDIT and then click the paper/pencil icon to open your blog. Click on the FEATURES TAB and select the BLOG CATEGORY from the drop down menu. Click OK to save changes.
Adding Meta Content to Blogs for SEO
Adding meta content to a blog entry enables you to provide search engine optimization for each blog entry. To add meta content, login and click EDIT. Then click on the paper/pencil icon for a particular story. Click on the META CONTENT tab, where you can enter the Page Title, Meta Description and Keywords that search engines can use to find your blog content and display the description provided in search results.
Allowing Blog Comments
Comments appear after the blog post in the article view. To allow anyone to add a comment anonymously, click on EDIT BLOG FEATURES, click on the FEATURES tab and check the Allow Anonymous Comments checkbox. Click OK to save changes.
All comments require a Captcha to prevent robots from spamming, and to discourage people from spamming. Blog Authors will receive an email if "Email Authors When Comments Added" is checked. All comments will need to be approved unless you check "Auto-Approve new Comments" in the blog record.
Enabling Recaptcha
To enable recaptcha, go to the page with the blog and login. Click on "Edit blog features" at the bottom of the page. Click on the FEATURES tab. Here you will click on the box next to "Allow Recaptcha" to enable recaptcha on this blog. Leave the box blank if you do not want to include recapcha on the blog. Click OK to save changes.