The Collaboration Tools add-on enables you to specify a certain group of people who appear in a directory on the page and share a calendar, uploaded documents, and notes. Users within a specified group can upload and manage documents, contact other users of the group and add calendar events.
How to Install the Collaboration Tools Add-On
Click here for information on Installing Add-Ons.
How to Add Collaboration Tools to a web page
When you are on the web page where you would like the collaboration tools to appear and are logged on as an Administrator, you will select the EDIT option from the menu. Next, click the paper/pencil icon. This will take you to the Edit record for your page, shown below:
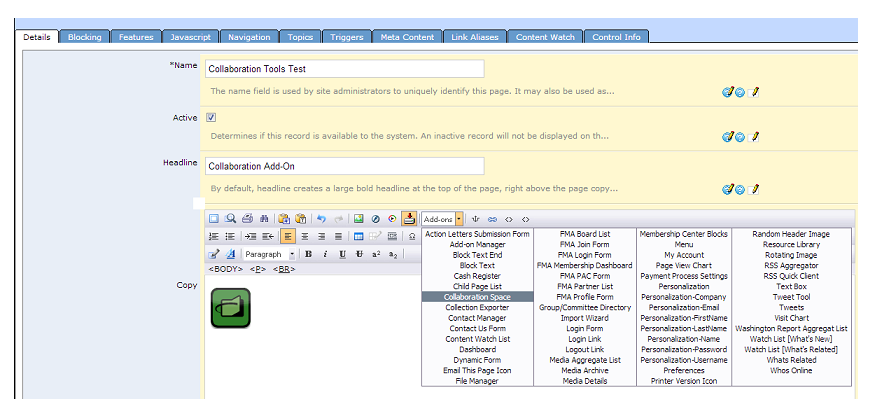
On this screen put your cursor in the Copy box, click on the Add-on drop down menu and select Collaboration Space. An image with the Contensive logo will appear in the Copy Box. Click OK at the top of the page to save the collaboration tools to your webpage.
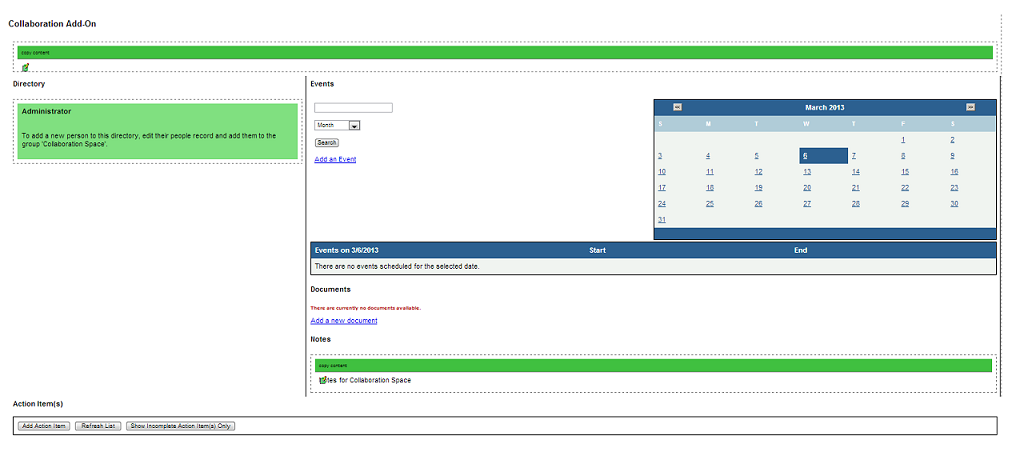
After you click OK, you will return to the webpage with the collaboration tools, where you will see the following:
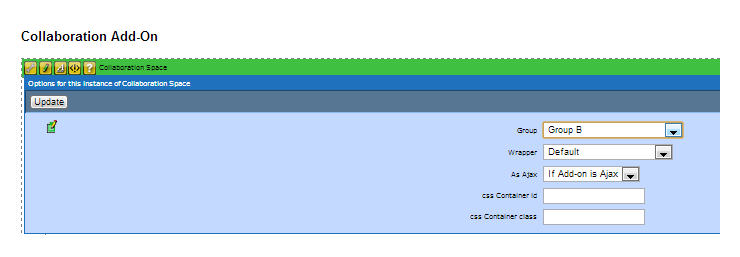
Next, click on ADVANCED EDIT. You will see the following screen, where you will click on the wrench from the menu and then select the GROUP that will use the web page for collaboration. Click UPDATE to save your changes.
Collaboration Directory
The Directory on the page lists all people in the group that has access to the web page. To enable additional people to access the page, edit their PEOPLE record and add them to the group by going to ADMIN, MANAGE USERS and then PEOPLE. Click on the GROUPS tab and place a check mark next to the group. Click OK to save changes.
Collaboration Calendar
The Calendar on the page lists all events associated with the specified group. To add events to the calendar, click ADD AN EVENT. Then you will enter all event information, including event name, start date and time, end date and time, a description of the event and a link to any web pages with more details about the event. Click ADD EVENT when you are done.
To view events for this group, click on a date to see any events for that date. Or, you can enter an event name or select the month or year from the drop down menu and click SEARCH to see all events that match your search criteria.
Collaboration Documents
The Documents listed on the page show all documents that can be viewed and edited by the specified group. To add documents to the page, click on "Add a new document". Next click CHOOSE FILE, and find the file on your computer, click on the file, and then click OPEN. You will then see the file name shown on the web page. Type the caption you want to show on the page in the NAME field and then click UPLOAD. You will then see the document in the list, along with the date added and document status.
If you click on the document name, it will show you the date it was added and last modified. It also shows who last modified the document.
Click on VIEW DOCUMENT to see the document. Click on CHECK OUT document to access the document to modify it.
Collaboration Notes
The Notes include a message from the administrator of the page. It can be a welcome to the page or any message you want to give the group. To edit the notes, login and click on EDIT. Then click the paper/pencil icon in the notes copy. You will then enter your text in the COPY section of the edit record. Click OK when you are done to save changes.
Collaboration Action Items
Action Items is an area on the page where you can manage any tasks for the collaboration group. To add an action item, click ADD ACTION ITEM. You will see the following screen:
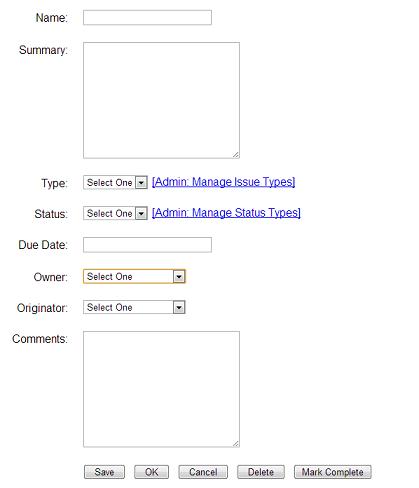
Enter all information necessary. To include TYPE and STATUS in the drop down menus, click on the ADMIN:MANAGE ISSUE TYPES or ADMIN:MANAGE STATUS TYPES and then you will click on ADD, enter the name and click OK to save. If you are entering a STATUS, you can check the box in the field COMPLETED STATUS to mark which status means the task is finished.
When you are done entering all information, click OK to save the task and return to the main screen. To edit a task that has been added to the list, click on the task name to open the edit record for the task. Click OK when you are done to save changes.